


StrikeMaster II Pro French Double-Door Reinforcement Kit Installation Instructions
Installing the Components
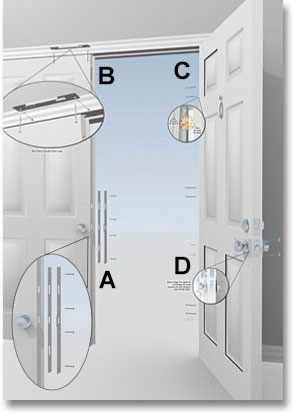
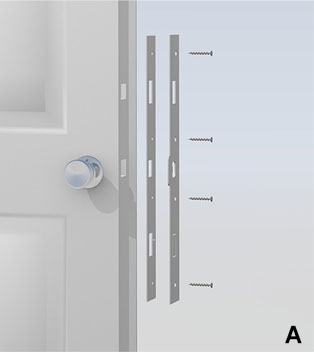
PART A - Installing the StrikeMaster II Pro on the Passive Door
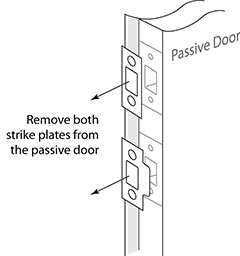 1. Remove door latch bolt and dead bolt strike plate hardware from passive door. DO NOT REMOVE WEATHER STRIPPING FROM THE DOOR.
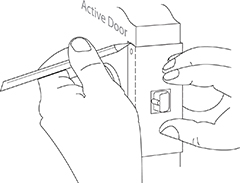
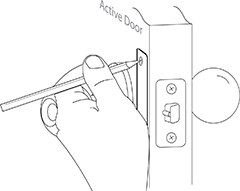
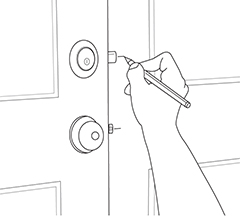 2. Extract deadbolt. Gently close the active door until both the latch bolt and the dead bolt touch the passive door edge. With a pencil, lightly mark on the passive door, the CENTER of BOTH bolts.
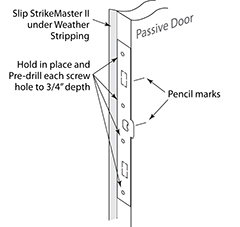 3. Using the StrikeMaster II piece with the 90 degree bend on one side; position it on the passive door edge so that the strike lip is facing out, slipping it under the weather stripping. Be sure to position the StrikeMaster II with the cut-outs centered on the center pencil marks on the door casing, BUT DO NOT REMOVE DEAD BOLT KNOCK-OUT. Hold in place and pre-drill each screw hole with a small drill bit to the depth of 3/4". Note: The latch bolt hole may have to be enlarged slightly to allow the Adjust-A-Tab to seat properly. Note: if you have a door alarm sensor that the StrikeMaster II interferes with, see instructions below.
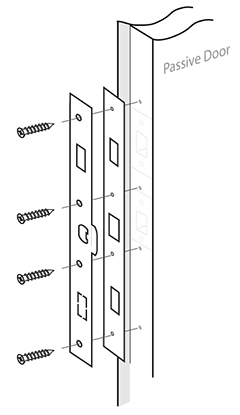 4. Position StrikeMaster II Pro pieces 1 and 2 together as one unit and place on passive edge. Be sure that the holes of both pieces line up with each other at the dead bolt cut-outs.
5. Insert a 1-1/2" screw in top and bottom screw holes and tighten (Caution: Do Not over tighten). The two pieces should be nested together and firmly attached to the door edge.
6. Insert and tighten remaining 1-1/2" screws into StrikeMaster II Pro screw holes.
7. After each screw is snug, place the passive door in the closed position and then close the active door. Check to make sure the doors close properly.
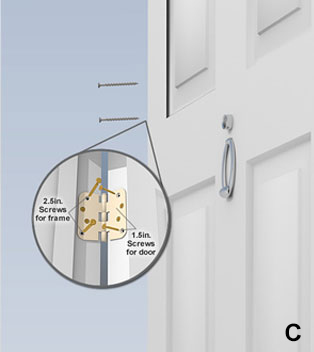
INSTALLING THE HINGE SCREWS
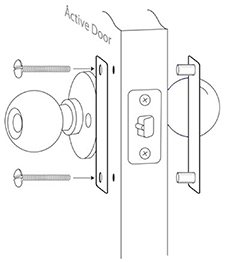
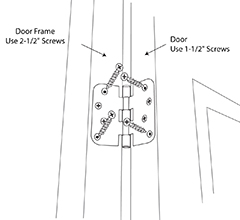 8. From each passive and active door hinges, remove two of the existing hinge screws (top and bottom) that attach the hinge to the door frame casing and replace each with the provided 2-1/2" screws. Tighten snug, but DO NOT OVER TIGHTEN. Complete this procedure on all six hinges
From each passive and active door hinges, remove two of the existing hinge screws (top and bottom) that attach the hinge to the door and replace each with the provided 1-1/2" screws. Tighten snug.
Remove the Dead Bolt Knock-out on StrikeMaster II
8. From each passive and active door hinges, remove two of the existing hinge screws (top and bottom) that attach the hinge to the door frame casing and replace each with the provided 2-1/2" screws. Tighten snug, but DO NOT OVER TIGHTEN. Complete this procedure on all six hinges
From each passive and active door hinges, remove two of the existing hinge screws (top and bottom) that attach the hinge to the door and replace each with the provided 1-1/2" screws. Tighten snug.
Remove the Dead Bolt Knock-out on StrikeMaster II
REMOVE THE DEAD BOLT KNOCK-OUT ON STRIKEMASTER II PRO
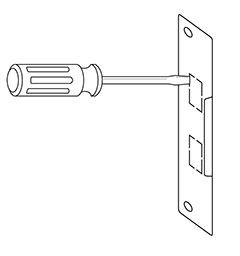
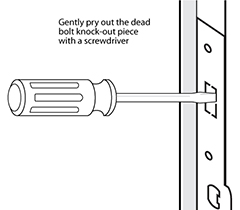 9. Making sure that the StrikeMaster II knock out is centered on the dead bolt hole, insert a screwdriver between the StrikeMaster II and the knock-out piece and gently pry the piece out of the knock-out.
TROUBLESHOOTING
Compensating for Non-Standard Latch Spacing
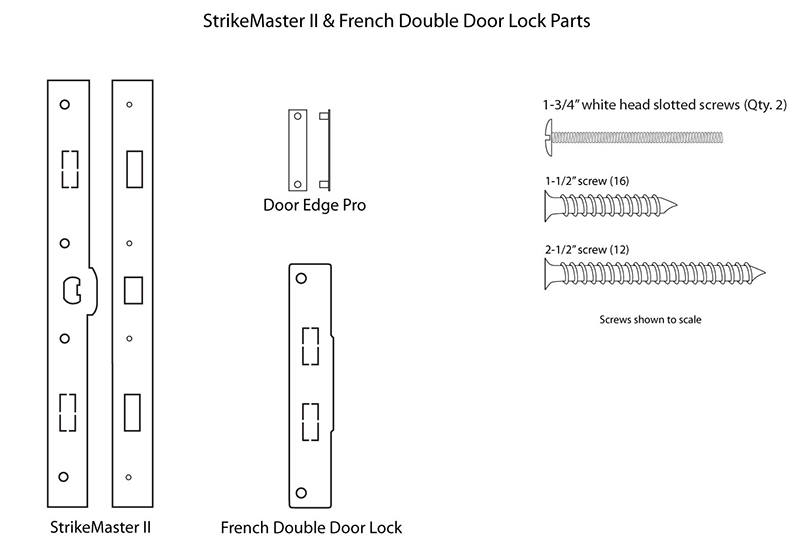
StrikeMaster II Pro is constructed of two parts. Both pieces fit together making one unit that goes on the edge of the passive door. The standard cut outs between the latch bolt and the dead bolt is 5-1/2" to 6". If you have a different distance between the two, take these steps to correct.
- Install the StrikeMaster II Pro and the hinge screws as directed.
- With the active door open, extend the dead bolt and put a small amount of toothpaste on the end of the bolt. Retract the dead bolt and close the door.
- Extend the dead bolt, it will leave a mark on the StrikeMaster II where the hole should be.
- Take a 1" bi-metal hole saw attached to a power drill, center the hole saw on the toothpaste mark and slowly cut out the area.
If you have a door alarm sensor
If you have sensors for a door alarm and the StrikeMaster II Pro interferes with the sensor, do the following;
- Before installing, mark on the StrikeMaster II Pro where it will cover the alarm censor and mark it.
- Attach the Strike Master II Pro to a short piece of 2 x 4, then with the bi-metal hole saw attached to a power drill, position the hole saw on the mark and slowly cut out the area.
If the active door will not seal tight
After the StrikeMaster II Pro is installed and the active door in the closed position does not seal tight to the weather stripping, with a flat head screwdriver slightly bend the Adjust A Tab to get a better seal.
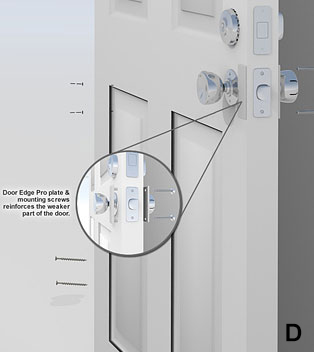
PART B - Installing the Door Edge Pro on the Active Door
 10. Using the enclosed installation template, on the edge of the active door, position the "+" on the center of the retracted dead bolt.
11. Fold the template at the dotted lines so it lays flat and level on both the inside and outside of the door.
12. With a pencil, mark the top of the template on both sides of the door..
 13. Position one of the Door Edge Pro so that the long edge lines up with the edge of the door and the top edge is even with the pencil marks.
14. Holding the Door Edge Pro in place, with a pencil, mark the screw holes on the door. Do this on both sides of the door. Be certain that the Door Edge Pro is positioned properly on both sides of the door when making your screw hole marks.
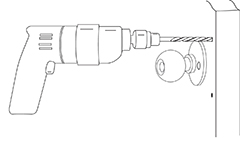 15. With the door closed, starting on the inside of the door, using a 1/4" drill bit, slowly drill into the door at the penciled screw hole marks. Caution: keep drill LEVEL and ONLY DRILL HALF-WAY THROUGH THE DOOR.
16. Repeat step 15. on the outside of the door. Drilled screw holes should now be perfectly aligned through the door.
17. Using a 5/16” drill bit, re-drill the holes from the OUTSIDE OF DOOR ONLY to a depth of 1/2” - this will allow the larger diameter studs in the outer half of the unit to be inserted.
 18. Insert the outdoor-half of the Door Edge Pro reinforcement plate (with two protruding studs) into the newly drilled holes on the outside of the door.
19. Position the indoor (flat) reinforcement plate of the Door Edge Pro on the inside of the door over the holes just drilled. Insert one of the 1-3/4” long slotted screws (provided)through the top hole in this plate until the screw threads mate with the adjoining stud in the outdoor plate from the other side of the door and tighten with a screwdriver.
20. Insert bottom screw in the same manner as described in Step 19 and tighten.
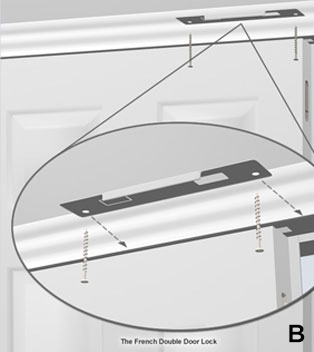
PART C - Installing the French Double-Door Lock
 21. Open both the active and passive doors.
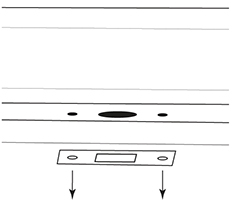
22. Remove the upper slide pin strike plate.
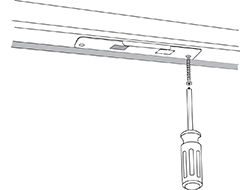
 23. Position the French Double-Door Lock on the upper door casing with one side tucked under the weather stripping and so that the 3/4" lip hangs over the inside of the top of the closed passive door.
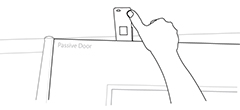
24. Position one of the knock-outs on the French Double-Door Lock to align with the passive door's upper slide pin so that when the pin is engaged with the door casing, it slides through the knock-out hole. Make sure that the 3/4" lip is still over the passive door. While in this position, one of the French Double-Door Lock's screw holes should be over the passive door and the other one over the active door. With a pencil, mark both screw holes.
25. With a small drill bit, pre-drill both screw holes to a depth of 3/4".
 26. Remove the slide pin knock-out.
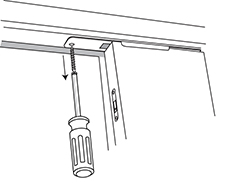
 27. With the French Double-Door Lock in its proper position, insert a 2-1/2" screw in the screw hole above the passive door and tighten.
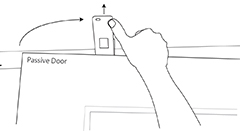
 28. With one hand, swing the French Double Door Lock so that the second screw hole is away from the door casing.
29. Gently lift the unsecured end of the French Double-Door Lock so that it clears the top of the passive door while closing it.
 30. Swing the French Double-Door Lock back to its locked position and insert a 2-1/2" screw in the screw hole above the active door and tighten.
 31. Slide pin should move freely through the French Double-Door Lock knock-out. And door is secure.
 32. To open the passive door, unscrew the screw in the French Double Door Lock above the active door,
 33. Swing it out away from the door,
34. Gently lift the French Double-Door Lock to clear the top of the passive door while opening.
Tip on Color Matching
To match the door and trim color, lightly sand all parts and paint.