


StrikeMaster II Pro Installation Instructions
Installing the StrikeMaster II Pro
- Remove all old hardware. Also remove any other items such as weather stripping from casing if needed. Place StrikeMaster II in place to check for clearance issues.
- Extract dead bolt throw. Gently close door until both strikes touch door casing trim. With pencil, lightly mark on door casing trim center of both strikes.
- Using the piece of StrikeMaster II with the 90-degree bend, position it on door casing. Be sure you position Strike Master II with cut outs on center marks on door casing. Hold in place and pre-drill each hole with a 5/32" drill bit to the depth of 2-1/4" NOTE: If you are installing the stainless steel (EPH289), then a counter-sink of 1/8"-1/4" will be needed per hole.
- Remove the caulking (if any) from the door casing with a ridged putty knife. Be sure that you remove only the caulking from the joint of the casing that will receive the angle piece of the StrikeMaster II. This allows the 90-degree break to slip under the casing trim. DO NOT REMOVE THE CASING TRIM.
- Interlock the two Strike Master II pieces together (tongue in groove) as one unit and place on casing. Be sure that the holes of both pieces line up with each other at the locking cut-outs.
- Insert a 2-1/2" screw in top and bottom holes and screw in for 2-1/4" (STOP). At this point align the two pieces of StrikeMaster II, and hold them even while tightening the bottom screw all the way in.
- Use the same procedure with the remaining screws, remembering to stop at 2-1/4"
- Using a large # 2 Phillips screwdriver tighten remaining 1/4"; as you tighten check to be sure that the 90 degree break is going behind the door trim. NOTE: A power drill can be used if you are careful not to over tighten. Over tightening will cause the door casing to be pulled sideways.
- After each screw is snug, try to close the door. If the door will not close then tighten the screw(s) at the area the door is hitting. If this does not allow the complete clearance, then take a short piece of 2x4 and tap firmly with a hammer between screws holes on StrikeMaster II where clearance is problem. (For additional security you could replace at least one of the screws in each door hinge with a 2-1/2" screw. This will increase substantially the hinge side. DO NOT over tighten the hinge side it could pull the casing out of alignment.
- After the door is closing properly, check the locking area and then re-caulk as necessary.
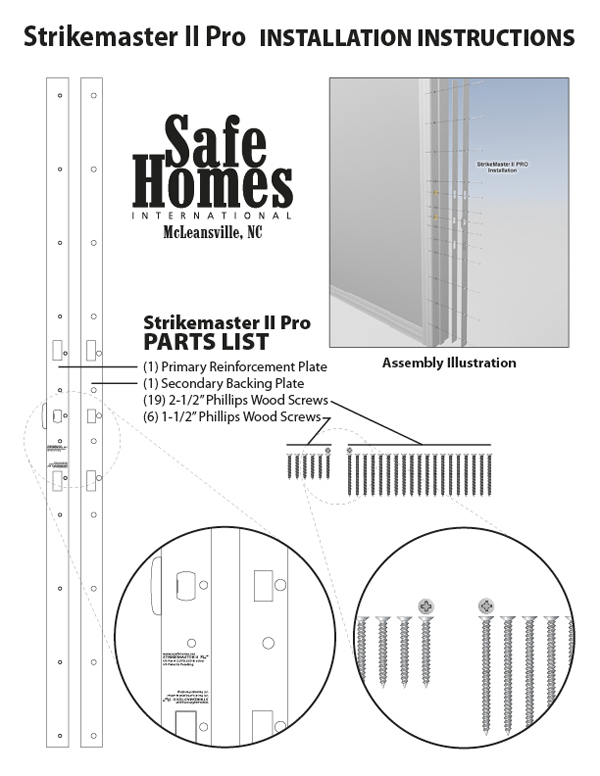
STRIKE MASTER II PRO IS CONSTRUCTED OF TWO PARTS.
Both pieces fit together making one unit that goes on the locking side of frame.
TROUBLESHOOTING
Correcting For Non-Standard Latch Spacing
The standard cut between dead bolt and entry lock is 5-1/2" to 6". If you have a different distance between the two, take these steps to correct.
- Install the StrikeMaster II Pro.
- Extend dead-bolt throw, and put small amount of toothpaste on end of throw.
- Retract the dead bolt throw and close the door, then try to extend dead-bolt throw, it will be marked where the hole should be.
- Take a 1/2" to 3/4" bi-metal hole saw and slowly cut out the area.
If You Have a Door Alarm Sensor
If you have sensors for a door alarm and the StrikeMaster II Pro interferes with the sensor here is what you do... Get the measurement to where the StrikeMaster II Pro will cover the sensor and mark it. Attach the Strike Master to a short piece of 2x4, then with a hole saw, slowly cut out the hole. This works very well, and looks great.
If Your Door Will Not Seal Tight
After the Strike Master II Pro is installed and the door in the closed position does not seal tight to the weather stripping, open the door and with a flat-head screwdriver slightly bend out the “Adjust A Tab” to get a better seal.
Tip on Color Matching
To match the door and trim color, lightly sand all parts and paint.